Follow Me On Social Media!


Homemade Pita Chips Recipe: Irresistibly Crunchy & Easy!
Introduction to Homemade Pita Chips Recipe
There’s a sense of satisfaction that comes from indulging in a homemade pita chips recipe. It’s more than just creating a tasty snack; it’s about crafting something from scratch that elevates any gathering or moment of relaxation. Picture this: You pull a tray of warm, crispy pita chips straight from the oven, and the aroma fills your kitchen like a warm hug. These chips are not only delightful in taste but incredibly versatile, perfect for dipping in hummus, pairing with salsa, or snacking on their own.
Crafting your own pita chips at home is an experience that brings together simplicity and creativity. With just a few basic ingredients, you can transform humble pita bread into crunchy bites of joy. As a young professional, finding healthy yet delicious snacks can be a challenge amid our busy lives. That’s where this recipe shines. It’s quick to whip up, requiring minimal effort and cleanup, so you can enjoy snack time without added stress.
Imagine gathering with friends after a long workweek, sharing stories over a bowl of your homemade pita chips, paired with your favorite dips. The laughter, the crunch, and the satisfaction of knowing you made them yourself makes every bite even more special. You might even find that your friends start asking for seconds—and thirds!
Making homemade pita chips can easily fit into your meal prep routine. They keep well in airtight containers, meaning you can make a large batch and enjoy them throughout the week. Plus, you can customize the flavors based on your mood! Want a savory kick? Sprinkle on some garlic powder and paprika. Prefer something sweet? Try a hint of cinnamon and sugar.
In the following sections, let’s dive into the ingredients that bring this simple yet delightful recipe to life, and prepare to impress your taste buds and friends alike!
Key Ingredients for Homemade Pita Chips
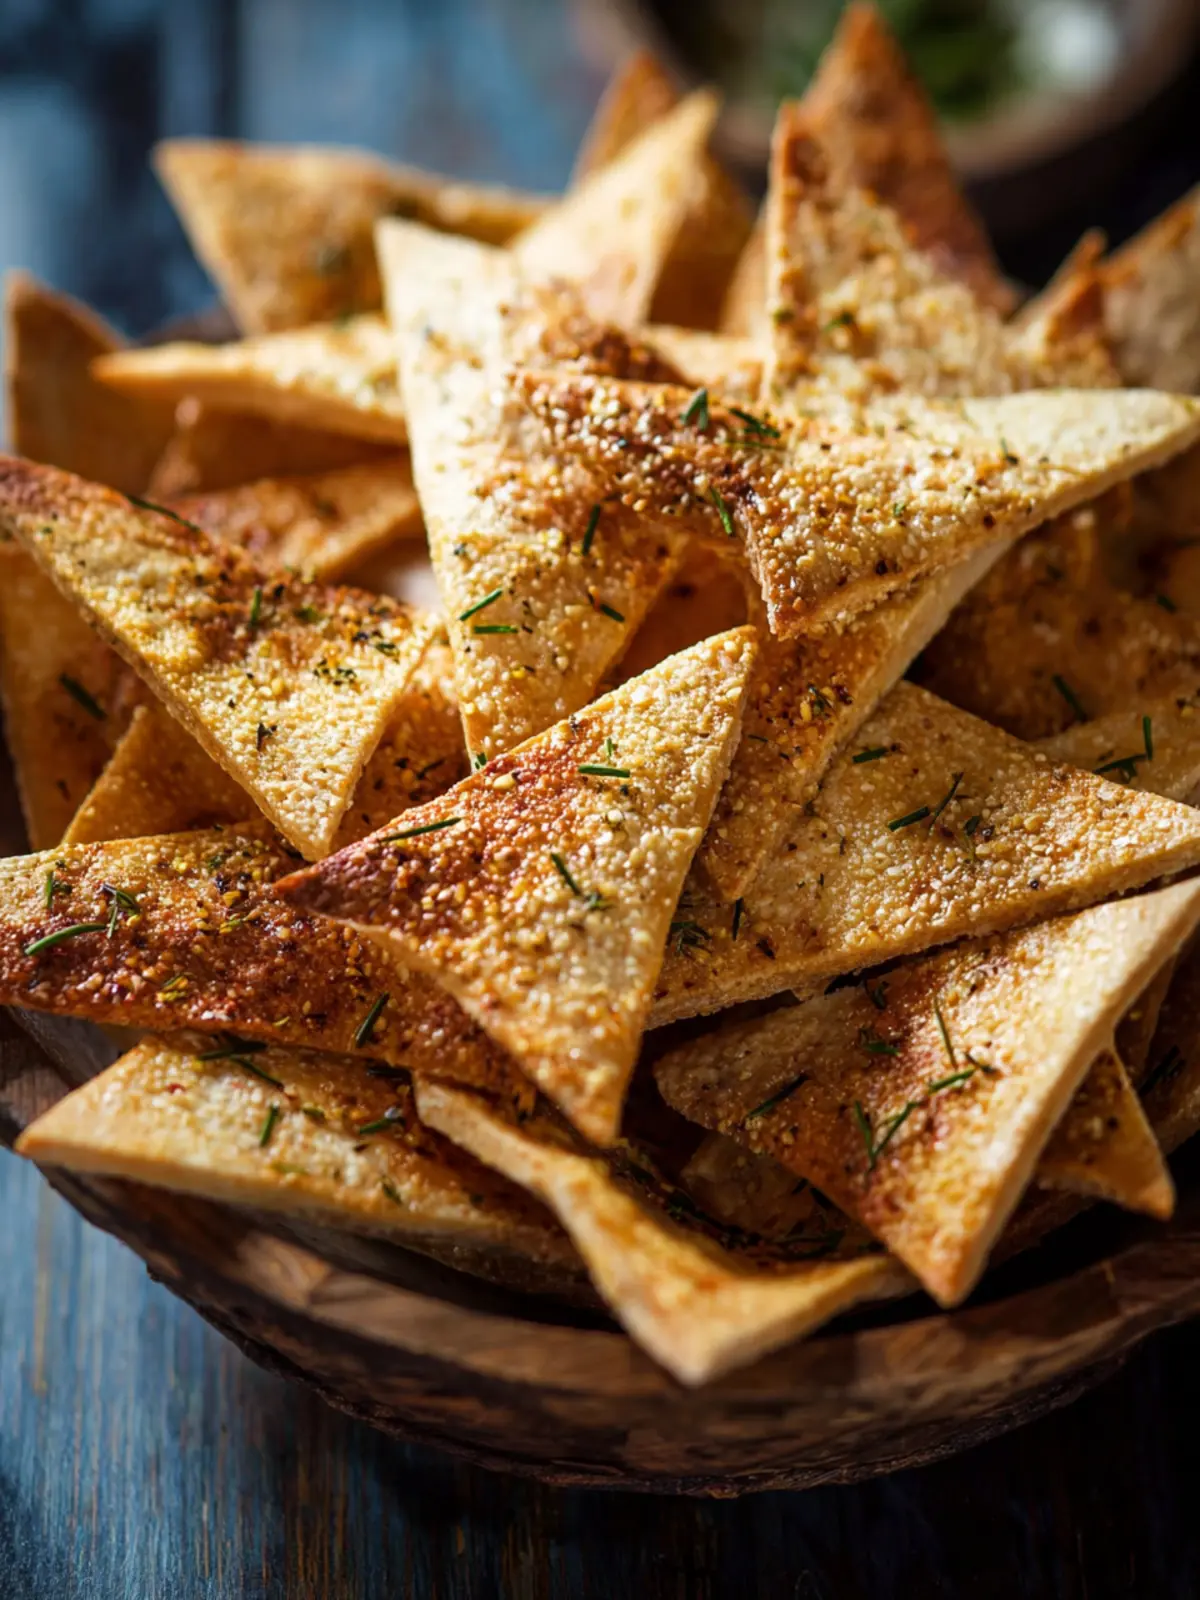
Pita Bread: The star of your homemade pita chips recipe is, of course, pita bread. I recommend using whole wheat pita for a nuttier flavor and extra crunch. If you prefer white pita, that works just as well! Be sure to choose fresh pita, as it gives your chips that delightful lightness when baked.
Olive Oil: A drizzle of good-quality olive oil is essential for achieving that golden, crispy finish. Not only does it help the seasoning adhere, but it also adds depth of flavor. I like to use a robust extra virgin olive oil for a rich taste.
Seasonings: This is where you can get creative! I typically stick to sea salt and garlic powder for a classic flavor, but feel free to experiment with paprika, cumin, or even a sprinkle of parmesan for a cheesy twist.
Fresh Herbs: For a vibrant touch, consider garnishing your chips with fresh herbs like rosemary or thyme before baking. This adds a fragrant aroma and elevates your snack!
Why You’ll Love This Recipe
Creating homemade pita chips is like discovering a new favorite snack that you didn’t know you needed. Imagine the satisfying crunch that fills the air as you bite into a warm, freshly baked pita chip, perfectly seasoned just to your liking. There’s something incredibly rewarding about making your snacks from scratch, and this homemade pita chips recipe is as simple as it is delicious.
A Snack You Can Customize
One of the best parts about this recipe is the ability to customize the flavors. Whether you prefer a sprinkle of sea salt, a dash of paprika, or a hint of garlic powder, you can tweak the seasonings to match your taste buds. Want a Mediterranean flair? Toss on some za’atar or oregano. This adaptability turns a simple snack into an explosion of flavors tailored just for you.
Healthier Alternative
For those conscious of their health, homemade pita chips emerge as a far healthier option compared to store-bought varieties. You control the oil, the spices, and the ingredients, allowing you to savor a guilt-free crunch. Plus, they pair beautifully with dips like hummus or tzatziki, making them even more delightful!
Perfect for Any Occasion
Whether you’re hosting a casual get-together, packing a lunch, or simply craving a delicious crunch, these chips are the perfect companion. Whip up a batch quickly and watch as they disappear—everyone will be asking for your secret recipe!

Variations
Creating your own homemade pita chips recipe can be such a fun adventure! Let’s explore some delightful variations to cater to every taste bud in your home.
Flavor Profiles
-
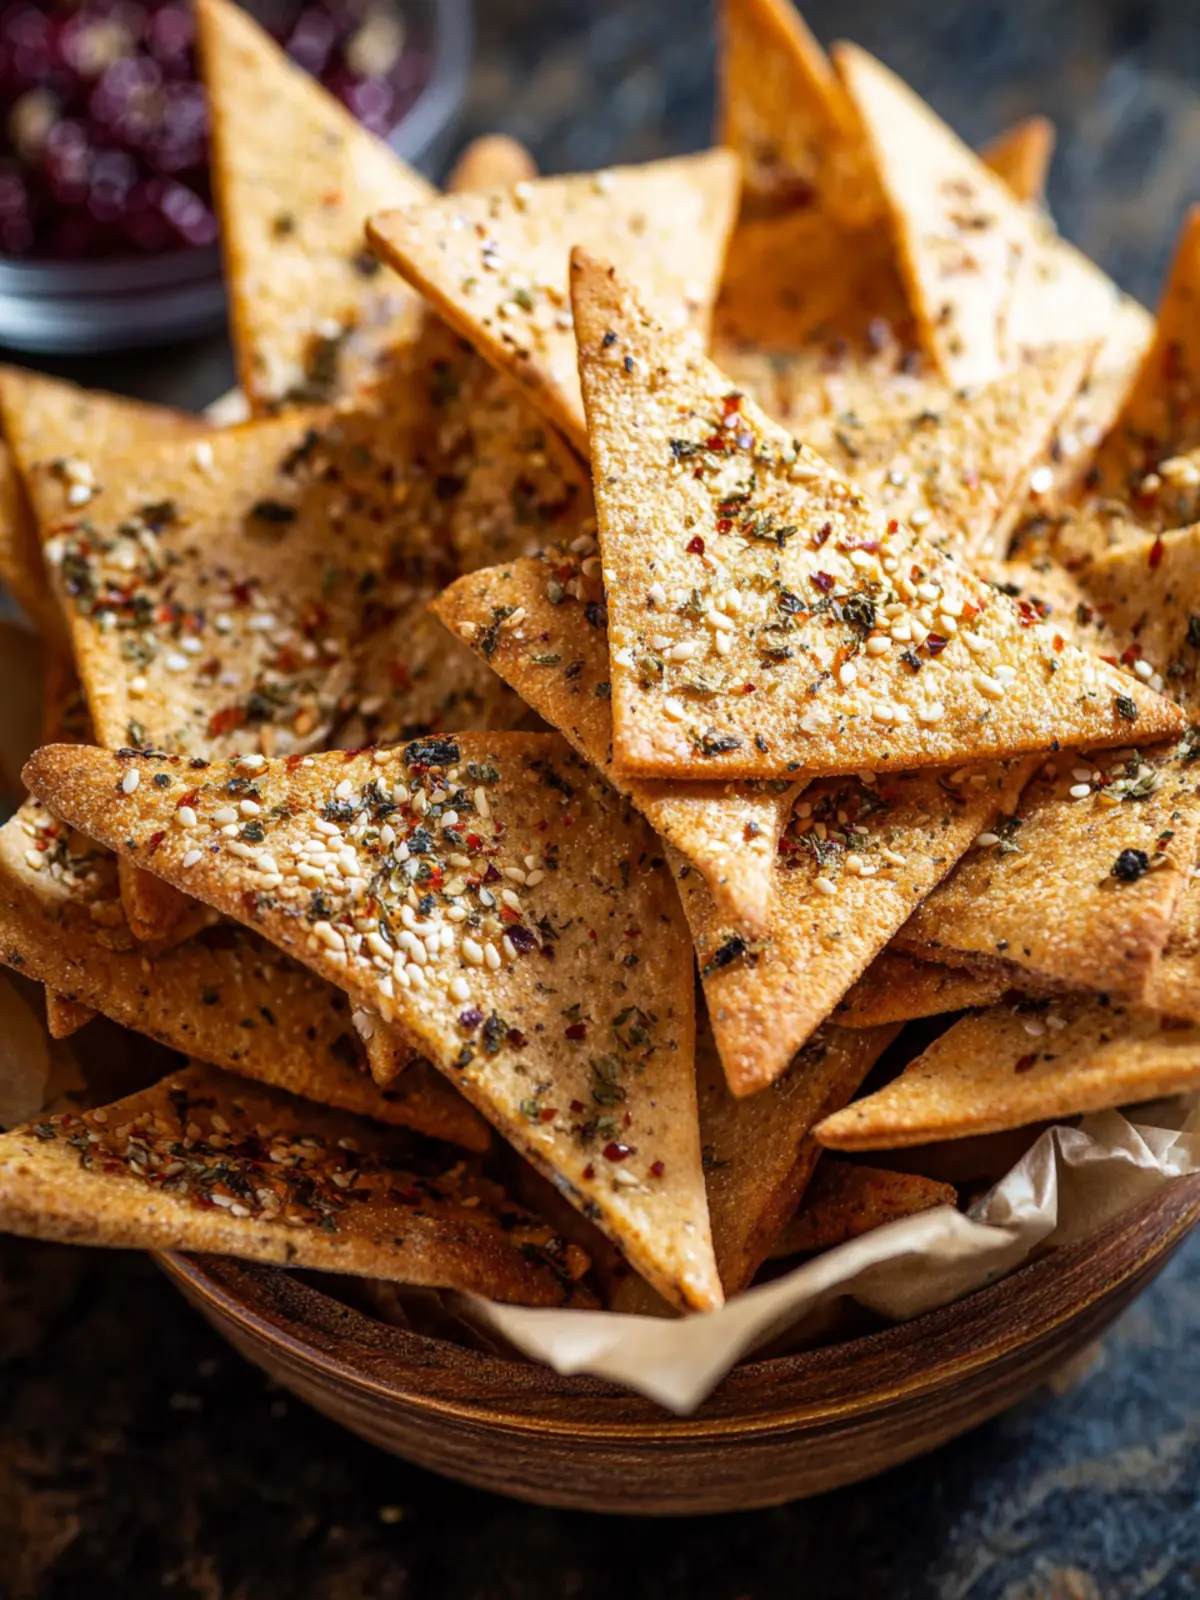
Herbed Delight: Before baking, try brushing your pita chips with olive oil mixed with dried herbs like oregano, thyme, or rosemary. This adds a gourmet touch that elevates your chips, making them perfect for entertaining.
-
Spicy Kick: If you’re in the mood for something with a kick, sprinkle some cayenne pepper or chili powder on your chips before baking. You can adjust the spice level to suit your palate, giving you crunchy chips with a fiery flair.
Sweet Twist
- Cinnamon Sugar: For a unique dessert option, combine sugar and cinnamon and dust it over the finished chips after they come out of the oven. Serve these sweet treats with a side of yogurt or a fruit dip for a delicious snack.
Dipping Sauces
- Pair your homemade pita chips recipe with various dips to enhance your snacking experience. Think classic hummus, creamy tzatziki, or even a spicy salsa. Mixing up the dips can keep your healthy snacks feeling fresh and exciting!
Experiment with Toppings
- Cheesy Goodness: For cheese lovers, try adding a sprinkle of grated Parmesan or cheddar on top of the chips during the last few minutes of baking. The melted cheese adds a savory twist that’s simply irresistible!
Feel free to get creative and mix these ideas to find your perfect chip!
Cooking Tips and Notes
Crafting the perfect homemade pita chips recipe goes beyond just following the instructions—it’s about embracing the process and adding your own flair. Here are some tips to elevate your pita chip game:
Choosing the Right Pita
Opt for fresh pita bread over packaged ones whenever possible. The fresher the bread, the better the chips will taste. Look for pita that’s soft and a little squishy, as it will give you a satisfying crunch once baked. Whole wheat pitas can also add a nutty flavor!
Seasoning Secrets
Don’t shy away from experimentation! While olive oil and salt are classic choices, consider adding garlic powder, dried herbs, or even a pinch of paprika for a kick. The key is to toss the pita triangles until they are evenly coated for consistent flavor.
Baking Tips
Keep an eye on your chips while they bake. Timing can vary depending on your oven, so start checking around the 8-minute mark. You want them golden and crispy but not burnt. If your chips aren’t as crisp as you’d like, toss them back in for a couple more minutes.
Storing Your Chips
To keep your homemade pita chips fresh and crispy, store them in an airtight container at room temperature. If you notice they start to lose their crunch, reheat them in the oven for a few minutes to restore their original texture.
With these thoughtful tips, you’ll turn your homemade pita chips recipe into a delightful snack that everyone will love!
Serving Suggestions
Once you’ve mastered the homemade pita chips recipe, it’s time to think about how to elevate your snacking experience. These chips are perfect for dipping, so consider pairing them with your favorite accompaniments. Here are a few suggestions:
- Hummus Varieties: Classic chickpea hummus is great, but don’t shy away from other flavors like roasted red pepper or garlic. They add a delightful twist that complements the crunch of the pita chips.
- Tzatziki Sauce: This refreshing cucumber and yogurt dip offers a cool contrast to the warm chips, making it an ideal partner for your pita crunch.
- Guacamole: For a more savory approach, the creamy richness of guacamole can turn your pita chips into a gourmet treat.
- Cheese Spreads: Try a soft cheese spread like goat cheese mixed with herbs; it’ll add a sophisticated touch to each bite.
- Salsa: Fresh salsa brings zest and brightness, turning your snack time into a mini fiesta.
Experiment with these combinations to find your personal favorite, and enjoy!
Time Breakdown
Creating your own homemade pita chips recipe not only yields delightful snacks but also allows you to manage your time efficiently. Here’s how the timing breaks down:
Preparation Time
Getting your ingredients together takes about 10 minutes. This includes slicing your pita bread and mixing in your favorite seasonings.
Baking Time
The chips will bake for around 15 minutes. Keep an eye on them, as they transform from soft to crispy in no time.
Total Time
All in all, from start to finish, you’re looking at roughly 25 minutes. Perfect for a quick snack or an impressive appetizer!
Nutritional Facts for Homemade Pita Chips
Making your own homemade pita chips not only satisfies your cravings but also gives you control over the ingredients and nutritional content. They’re perfect for dipping or snacking, but it’s good to know what you’re munching on as you enjoy this delightful treat.
Calories
Each serving of these homemade pita chips contains approximately 130 calories. This makes them a guilt-free option for a snack, especially when compared to traditional potato chips.
Protein
You’ll find about 3 grams of protein per serving, which is a nice bonus that helps keep you fuller longer. Whole wheat pita provides this protein, making it a wholesome choice.
Sodium
With just 150 milligrams of sodium per serving, these pita chips are a smart way to keep your salt intake in check. This is far lower than many store-bought snacks, allowing you to enjoy your chips without worrying about excess sodium.
Incorporating these nutritional insights can enhance your experience of the homemade pita chips recipe, making your snack both delicious and informed.
FAQs about Homemade Pita Chips
When you dive into the world of making homemade pita chips, it opens up a treasure of questions most of us have. From seeking that perfect crunch to exploring dipping options, let’s tackle those queries together.
How can I make my pita chips extra crispy?
To achieve that delightful crunch in your homemade pita chips recipe, consider a couple of simple tips. Firstly, ensure the pita is very thinly sliced. The thinner the slices, the better the result! Secondly, after brushing them with olive oil and seasoning, allow them to bake longer at a slightly lower temperature. This process helps moisture evaporate, yielding a crunchier finish. Finally, don’t forget to let your chips cool on a wire rack; this prevents steam from making them soggy.
Can I make this recipe gluten-free?
Absolutely! You can easily adapt this homemade pita chips recipe to be gluten-free by using gluten-free pita bread. Many grocery stores now carry gluten-free pita options that work just as well. Just keep an eye on the cooking time, as gluten-free products can behave differently than traditional pita.
What dips pair well with pita chips?
Pita chips are versatile and complement a range of delicious dips. Here are a few favorites:
- Hummus: A classic pairing, hummus adds creaminess and flavor.
- Tzatziki: This refreshing yogurt and cucumber dip is perfect for those warm summer days.
- Guacamole: For a fun twist, try pairing your chips with guacamole for an unexpected blend of flavors.
- Spinach Artichoke Dip: A hearty option that makes for a great party snack.
With these tips, homemade pita chips can elevate your snacking experience, providing both crunch and compatibility with a variety of dips!
Conclusion on Homemade Pita Chips
Creating your own homemade pita chips is a delightful culinary adventure that elevates snacking to a whole new level. Once you experience the satisfying crunch and rich flavor of freshly baked chips, you’ll understand why it’s worth the effort. Not only can you customize the seasoning to match your mood, but these chips also pair beautifully with your favorite dips. Sharing them with friends at your next gathering can bring smiles and happy munching. Simple, health-conscious, and delicious, this homemade pita chips recipe ensures that every bite is as enjoyable as the last. Embrace the joy of making them today!
Print
Crispy Pita Chips
- Total Time: 25 minutes
- Yield: 4 servings 1x
- Diet: Vegetarian
Description
Delicious homemade crispy pita chips that are perfect for dipping or snacking!
Ingredients
Scale
- 6 ounces Pita bread (2–3 thin “pita pockets”)
- Extra virgin olive oil, for brushing, or use spray olive oil
- Salt to taste
- Optional additions: sesame seeds, zaatar, dukkah, sumac, garam masala, granulated garlic powder (or onion powder), furikake, or everything bagel spice
Instructions
- Preheat oven to 300F.
- If pita bread is thick, cut it in half, then split the pockets open so you have thinner pieces.
- Brush or spray top side with olive oil.
- Sprinkle with salt and any of the optional spices or seeds.
- Cut into triangles or long wedges.
- Place on a parchment-lined sheet pan in the middle of the oven.
- Bake until crisp and golden, 10-20 minutes, depending on the thickness of the pita. Keep a close eye, lowering heat if need be! The thinner the pita, the faster it will cook.
- Let them cool, they will further crisp up as they cool.
Notes
- Store the cooled pita chips in an airtight container to keep them crispy.
- You can experiment with different spice combinations for variation.
- Prep Time: 10 minutes
- Cook Time: 15 minutes
- Category: Snack
- Method: Baking
- Cuisine: Mediterranean
Nutrition
- Serving Size: 1 serving
- Calories: 120
- Sugar: 0g
- Sodium: 200mg
- Fat: 7g
- Saturated Fat: 1g
- Unsaturated Fat: 6g
- Trans Fat: 0g
- Carbohydrates: 14g
- Fiber: 2g
- Protein: 3g
- Cholesterol: 0mg