Follow Me On Social Media!


Healthier Homemade Tagalongs: Irresistibly Guilt-Free Delights
Introduction to Healthier Homemade Tagalongs (Girl Scout Peanut Butter Cookies)
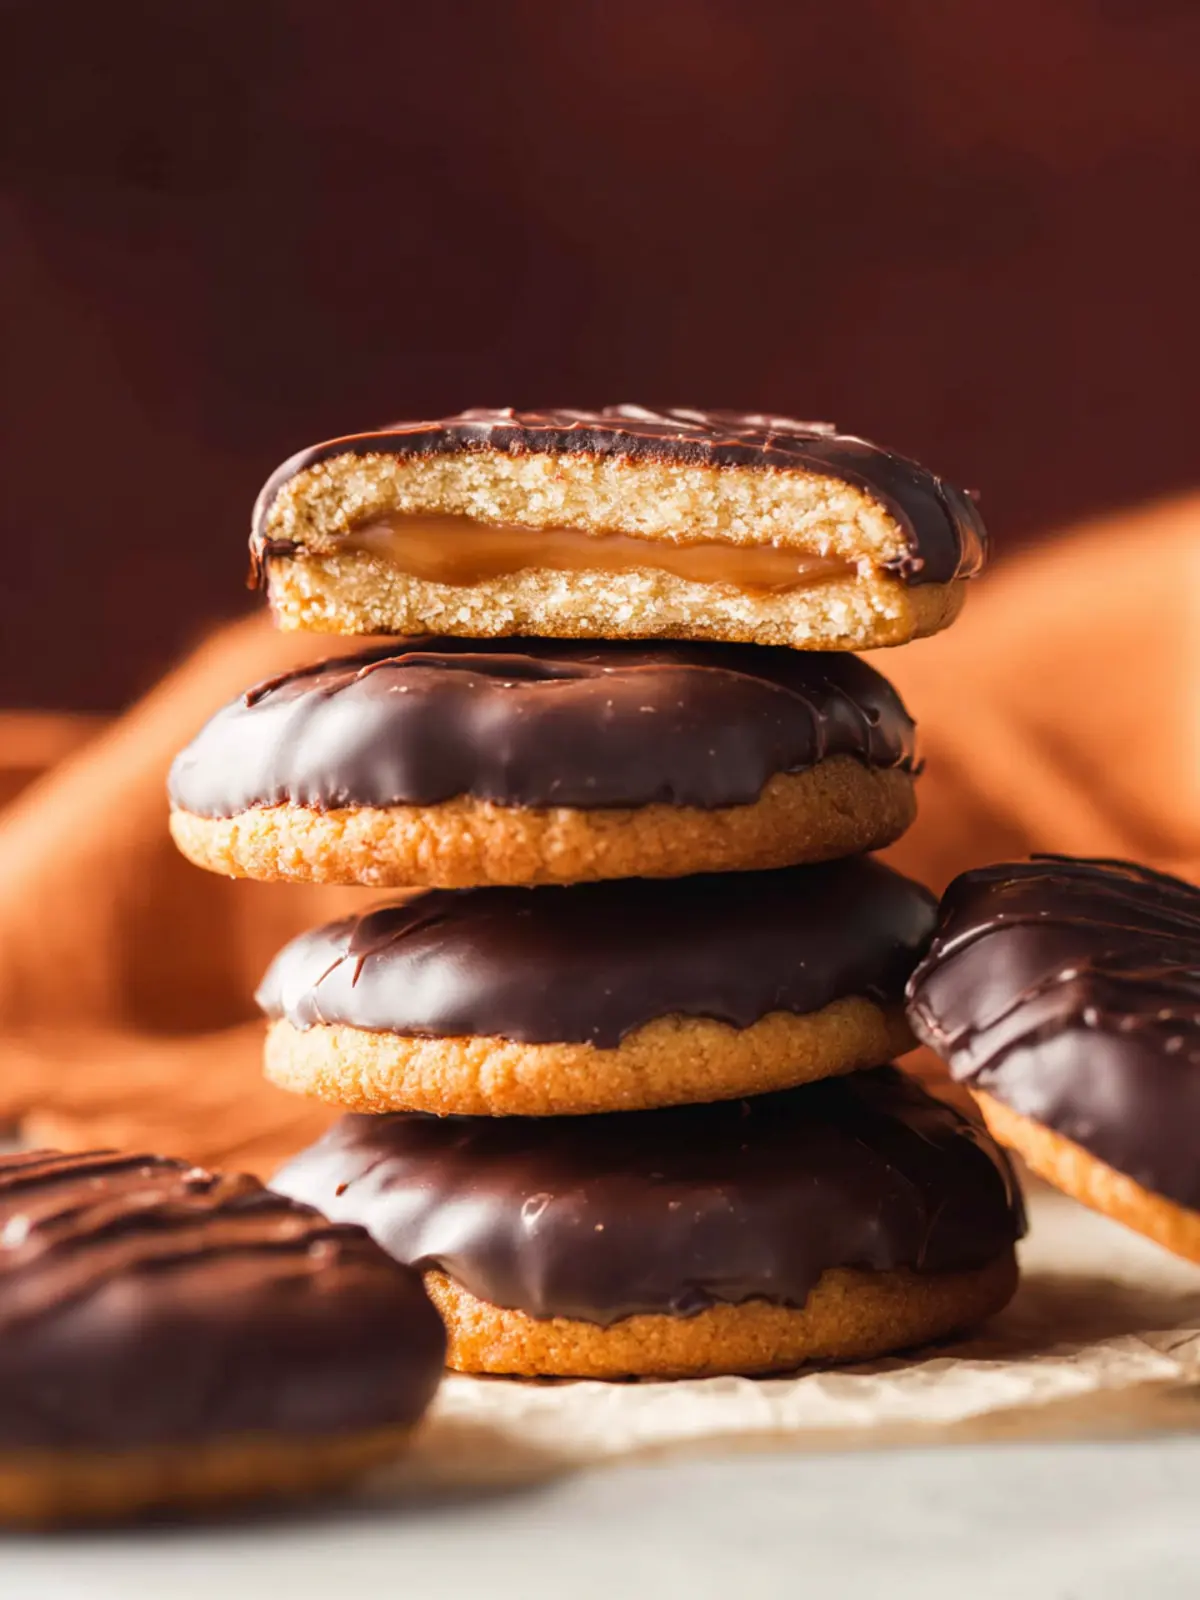
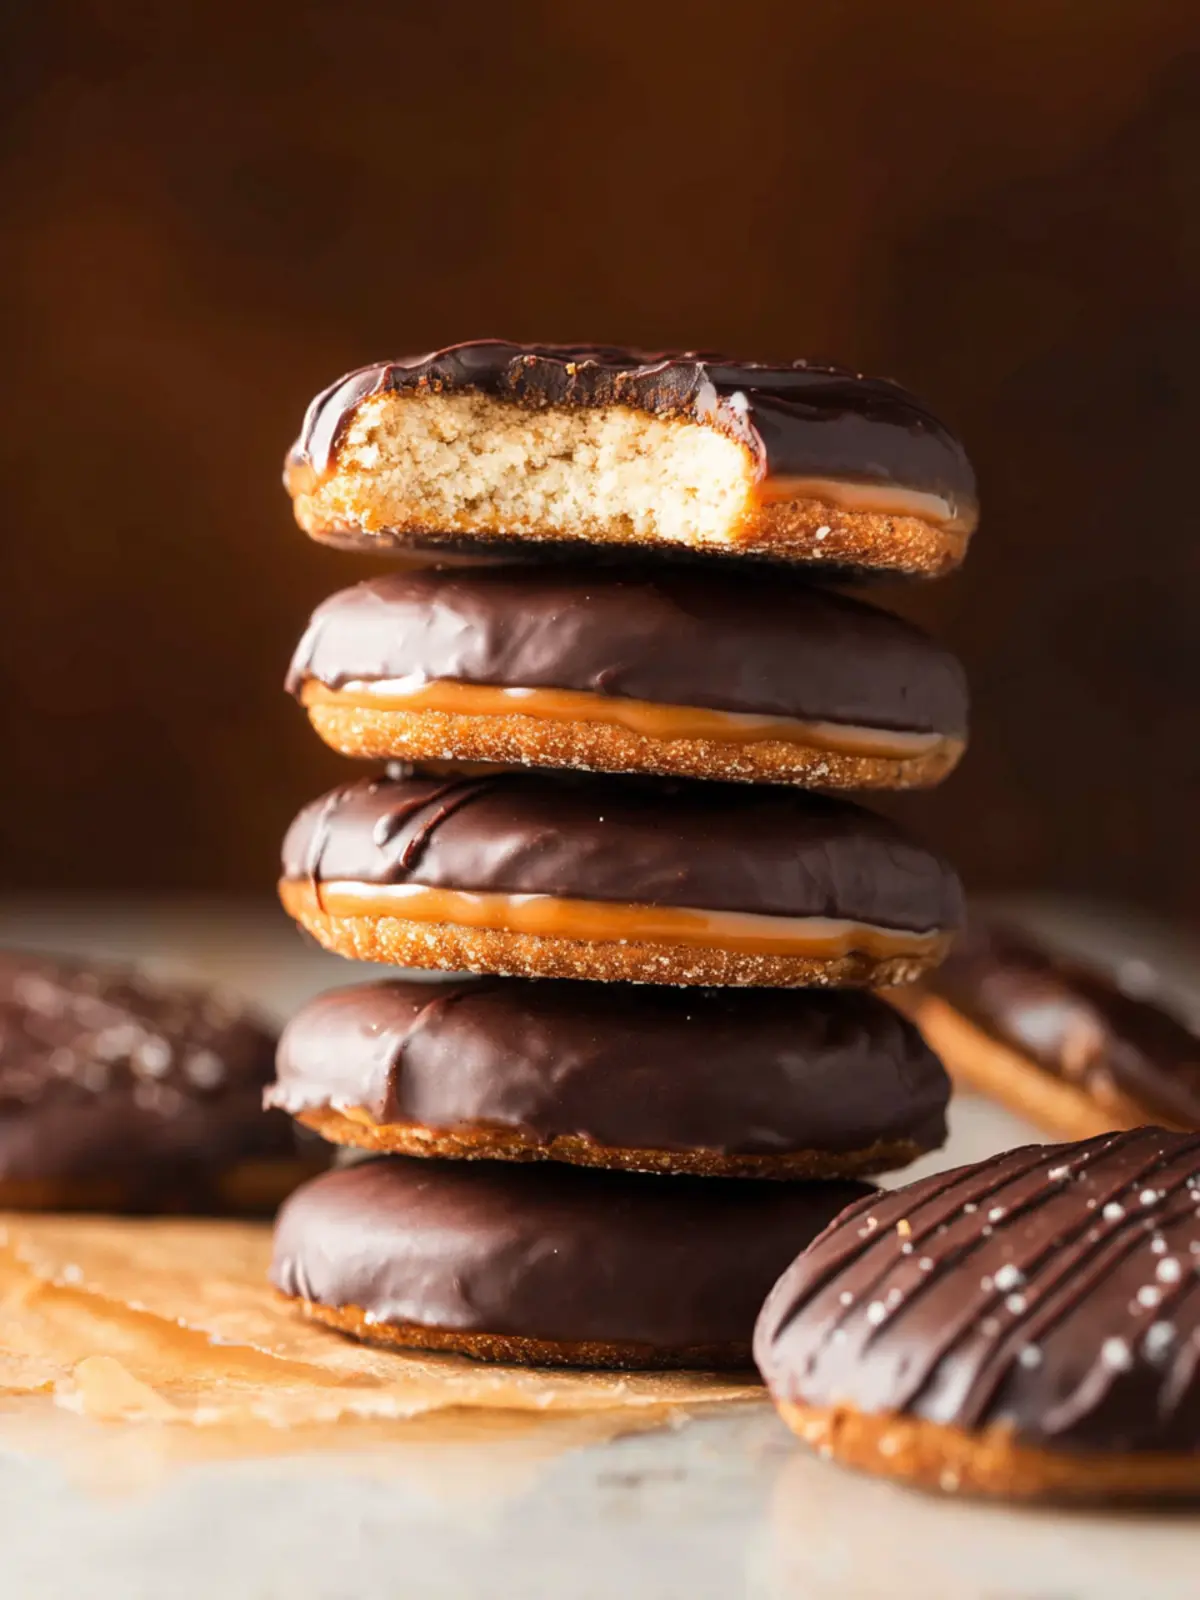
Imagine biting into a Healthier Homemade Tagalong, where the velvety layer of peanut butter meets a crispy yet chewy cookie base, all coated in rich dark chocolate. That’s the kind of indulgence I love, and it doesn’t have to come with a side of guilt! These delightful cookies not only satisfy your sweet tooth but also allow you to enjoy a beloved classic with a modern, healthier twist.
Making Tagalongs at home brings a special connection to the kitchen, crafting something delicious with your own hands. Unlike the store-bought variety, these cookies let you control every ingredient, ensuring that you’re incorporating wholesome choices without sacrificing the taste. Plus, when you whip these up yourself, you can experiment a bit—perhaps swapping out sugar for honey, or using a nut butter of your choosing. The possibilities are endless!
What Makes Homemade Tagalongs So Special?
-
Quality Ingredients: When making Healthier Homemade Tagalongs, you can opt for high-quality ingredients that suit your dietary preferences. Choose organic peanut butter, whole grain flour, or even gluten-free substitutes to create a cookie that’s aligned with your health goals.
-
Customization: Maybe you’re a fan of dark chocolate? You can use a higher cocoa percentage for a richer taste. Want it a bit less sweet? Adjust the sugar amount accordingly! The beauty of making these at home is the freedom you have to customize the cookies to fit your specific cravings.
-
Nostalgia with a Twist: These cookies evoke nostalgic feelings of childhood, evoking memories of Girl Scout cookie seasons. With a healthier version, you can relive those moments while promoting better choices for your body and lifestyle.
-
Freshness and Flavor: There’s nothing quite like the aroma of cookies baking in your oven. The freshness not only enhances the flavor but also enriches your experience. You’ll find that the homemade version can often taste better than the original!
As we dive into the recipe, prepare yourself for a delightful culinary journey that marries nostalgia with modern health awareness. Let’s get started on making these Healthier Homemade Tagalongs!
Key Ingredients for Healthier Homemade Tagalongs
Healthier Homemade Tagalongs are a delectable twist on the classic girl scout cookie. They offer that same satisfying crunch and creamy filling but with a healthier spin.
Whole Grain Flour
I love using whole wheat flour as a base for the cookies. It adds fiber and essential nutrients without sacrificing texture. You can also use almond flour for a gluten-free option, which lends a delightful nuttiness to the cookies.
Natural Peanut Butter
Using natural peanut butter is essential for that rich, creamy filling. Look for varieties that contain just peanuts and salt. It’s healthier and lets the true peanut flavor shine through.
Coconut Oil
Coconut oil replaces traditional butter, providing a light texture and pleasant flavor. Plus, it’s a healthier fat source that can help make the cookies a bit more indulgent without the guilt.
Sweeteners
I opt for a blend of pure maple syrup and coconut sugar for sweetness. This combination balances flavors beautifully while reducing the glycemic impact compared to granulated sugars.
Dark Chocolate
For the coating, dark chocolate not only enhances the flavor but also contains antioxidants. Choose a variety with at least 70% cocoa for maximum health benefits.
Balancing flavor and nutrition can be a challenge, but with these key ingredients, your Healthier Homemade Tagalongs will be a hit at any gathering. Enjoy!
Why You’ll Love This Recipe
Imagine indulging in a sweet, satisfying treat that not only reminds you of nostalgic Girl Scout cookies but also aligns with your health goals. That’s exactly what you get with Healthier Homemade Tagalongs. These delicious peanut butter cookies won’t have you feeling guilty about dessert; instead, they’ll keep you coming back for more!
Guilt-Free Indulgence
What sets these Healthier Homemade Tagalongs apart? The use of wholesome ingredients like natural peanut butter and whole grain flour makes every bite taste divine while offering nutritional benefits. You get the classic flavors you love without compromising on health, which is a huge win for anyone juggling a busy lifestyle.
Customizable for Everyone
Whether you’re vegan, gluten-free, or simply looking for a lighter version of the beloved treat, this recipe is flexible. You can swap out specific ingredients to suit your dietary needs. Want a twist? Try adding a sprinkle of cinnamon or a dash of sea salt to elevate the flavor profile even further!
Easy to Make
Perfect for those with a hectic schedule, this recipe requires minimal prep and delivers delicious cookies you can whip up in no time. Plus, they’re great for sharing! Impress your friends or enjoy them solo—the choice is yours.
With every bite of these Healthier Homemade Tagalongs, you’ll experience not just the joy of a cookie but also the satisfaction of making a smart, delicious choice.
Variations on Healthier Homemade Tagalongs
Exploring Healthier Homemade Tagalongs opens up a world of creative modifications that not only maintain that beloved cookie taste but also enhance their nutritional value. Remember when you were a kid, eagerly waiting for Girl Scouts to show up with those iconic boxes of Tagalongs? By experimenting with healthier ingredients, you can bring those cherished flavors to your kitchen without the guilt.
Alternative Flours
You can swap out all-purpose flour for coconut flour or almond flour for a gluten-free option. These alternatives add healthy fats and fiber, contributing to a balanced treat that doesn’t skimp on texture or flavor.
Nut Butter Varieties
While traditional recipes call for peanut butter, consider using almond butter or sunflower seed butter. Each brings its own unique taste and nutrition profile, with almond butter being a great source of Vitamin E and sunflower seed butter being allergy-friendly but still rich in protein.
Sweetener Swaps
If you’re aiming to reduce sugar, try using natural sweeteners like maple syrup or agave nectar in place of granulated sugar. These options can bring about a depth of flavor while keeping sugar levels in check.
Add-Ins and Toppings
Beyond the classic chocolate coating, think about drizzling melted dark chocolate with a sprinkle of sea salt or crushed nuts for an extra crunch. You could even fold in some superfoods like chia seeds or flaxseeds into the peanut butter layer for additional health benefits.
The possibilities for Healthier Homemade Tagalongs are endless! Embrace your inner creativity and enjoy a treat that’s both nostalgic and nourishing.
Cooking Tips and Notes for Healthier Homemade Tagalongs
Creating healthier homemade Tagalongs is not just about making a tasty treat; it’s about crafting a guilt-free indulgence that satisfies your sweet cravings while nourishing your body. Here are some expert tips to elevate your cookie-making game.
Ingredient Swaps for Flavor and Health
-
Nut Butter: Consider using almond or sunflower seed butter instead of traditional peanut butter to introduce unique flavors and cater to different dietary needs. These alternatives provide healthy fats and protein without compromising on taste.
-
Whole Grains: For a more wholesome base, opt for whole wheat flour instead of all-purpose flour. This switch not only enhances the nutritional profile but also adds a delicious, nutty flavor that complements the cookies perfectly.
Managing Sweetness
- Reduce Sugar: You can lessen the sugar in the recipe by using natural sweeteners, such as maple syrup or honey. These alternatives provide sweetness while adding a touch of complexity, making your Tagalongs even more delightful.
Baking Tips for Perfection
-
Chilling the Dough: Allowing your cookie dough to chill for at least 30 minutes is key to achieving that perfect shape and texture. This helps the fats solidify, preventing the cookies from spreading too much during baking.
-
Even Baking: Use a silicone baking mat or parchment paper to ensure even baking. This minor step can lead to perfectly golden bottoms and prevent sticking.
With these tips in mind, you’re all set to whip up your healthier homemade Tagalongs! Happy baking!

Serving Suggestions for Healthier Homemade Tagalongs
Creating Healthier Homemade Tagalongs is just the beginning; how you serve them can elevate the experience even further. Whether you’re sharing them with friends or savoring them solo, consider these delightful serving suggestions to enhance your enjoyment.
Pairing with Fresh Fruit
A simple yet effective way to balance the rich flavors of your Tagalongs is to serve them alongside fresh fruit. Slices of crisp apples or juicy strawberries provide a refreshing contrast, cutting through the sweetness and adding a dose of vitamins. Plus, who can resist the delightful combo of chocolate and fruit?
Enjoy with a Warm Beverage
Nothing pairs better with cookies than a warm drink. Try serving your Healthier Homemade Tagalongs with a rich cup of coffee or a creamy chai latte. The warmth of the beverage contrasts beautifully with the chilled chocolate coating of the cookies, creating a comforting treat. For a caffeine-free option, herbal tea works wonders too!
Create a Cookie Platter
Hosting a get-together? Make your Tagalongs the star of a dessert platter by displaying them alongside other healthier cookies. Include options like oatmeal raisin or almond flour cookies to appeal to different tastes. This not only looks visually enticing, but it also invites your guests to engage and share their thoughts on each delicious bite.
Storage Tips
If you find yourself with leftovers (though it’s unlikely!), store your Healthier Homemade Tagalongs in an airtight container. They’ll stay fresh for up to a week at room temperature—perfect for those late-night cravings!
By thoughtfully considering how to serve your Tagalongs, you can transform a simple homemade treat into a memorable experience that delights both the palate and the spirit.
Time Breakdown for Healthier Homemade Tagalongs
Creating Healthier Homemade Tagalongs is not just about enjoying delicious cookies; it’s also a fun culinary adventure that can fit into a busy schedule. Here’s how you can manage your time efficiently.
Preparation Time
To start off, set aside about 15 minutes to gather your ingredients and prep your workspace. This includes measuring out your peanut butter, oats, and other essentials. Remember, a well-organized kitchen makes the process smoother and more enjoyable!
Baking Time
Once you’ve prepped your ingredients, you’ll spend around 12 to 15 minutes baking your delightful cookie bases. Keep an eye on them to ensure they don’t over-bake—golden brown is the goal!
Total Time
In just about 30 minutes from start to finish, you’ll have a tasty batch of Healthier Homemade Tagalongs ready to enjoy. It’s the perfect excuse for a quick break in your day, and you can feel good knowing you made them yourself!
Nutritional Facts for Healthier Homemade Tagalongs
When you decide to make Healthier Homemade Tagalongs, you’re not just indulging in a nostalgic treat; you’re also making a conscious choice for your health. These cookies creatively combine flavor and nutrition, making them a delightful and guilt-free dessert option.
Calories
Each serving of these Healthier Homemade Tagalongs contains approximately 150 calories. This is a great alternative for those who want to satisfy their sweet tooth while keeping calorie count in check.
Protein
These cookies pack about 5 grams of protein per serving, thanks to the peanut butter. This not only adds richness but also helps keep you feeling fuller longer, making them a smart snack choice.
Sodium
With only 70 mg of sodium in each serving, these Healthier Homemade Tagalongs remain heart-friendly. Keeping sodium levels low is essential for maintaining overall health, particularly for those watching their blood pressure.
Incorporating these homemade delights into your diet can elevate your dessert game without derailing your health goals!
FAQs about Healthier Homemade Tagalongs
When you decide to whip up a batch of healthier homemade Tagalongs, it’s not just about satisfying a sweet tooth—it’s about crafting a guilt-free indulgence that’s both delicious and nutritious. Let’s dive into some frequently asked questions that can elevate your cookie-making experience!
How can I make my Tagalongs crunchier?
If you’re aiming for that perfect crunch in your Tagalongs, consider tweaking the texture of your base. Here are a few tips:
- Use crunchy peanut butter: This adds not only flavor but also extra texture.
- Bake a bit longer: Keep an eye on them to ensure they don’t burn, but a few extra minutes can result in a delightful crunch.
- Add a secret ingredient: Try incorporating chopped nuts into your cookie dough for added crunch!
What’s a good substitution for peanut butter?
Whether you’re allergic or just looking to change things up, there are excellent alternatives to peanut butter. Here are some swaps:
- Almond butter: Creamy and slightly sweeter, it gives a similar texture and taste.
- Cashew butter: This nut butter has a more subtle flavor and is great if you’re looking for something mild.
- Sunflower seed butter: A fantastic nut-free option, offering a unique taste without the allergens.
Can I store them outside, or do they need refrigeration?
Storing your healthier homemade Tagalongs properly is crucial for maintaining flavor and texture. Here’s how to do it right:
- Room Temperature: They can be stored in an airtight container at room temperature for about a week.
- Refrigeration: For longer shelf life, or if you prefer them chillier, you can refrigerate them. This also helps retain their freshness.
Happy baking! Enjoy your healthier homemade Tagalongs and the smiles they bring!
Conclusion on Healthier Homemade Tagalongs
Crafting your own Healthier Homemade Tagalongs not only satisfies your sweet tooth but also offers you a chance to enjoy a classic treat with a nutritional boost. By using wholesome ingredients like natural nut butter and dark chocolate, you can feel good about indulging. Imagine surprising friends with your delicious, guilt-free version that’s sure to bring back memories of selling and buying those iconic Girl Scout cookies. Whether enjoyed as a post-work snack or a dessert, these treats remind us that homemade is always better. So roll up your sleeves, get baking, and savor the satisfaction of these delightful bites!
Print
Peanut Butter Chocolate Cookies
- Total Time: 40 minutes
- Yield: 24 cookies 1x
- Diet: Gluten-Free
Description
Delicious gluten-free peanut butter cookies dipped in chocolate.
Ingredients
Scale
- 1 1/2 cup almond flour
- 3 tablespoons coconut flour
- 1/2 teaspoon salt
- 3 tablespoons melted coconut oil
- 5 tablespoons maple syrup
- 1 teaspoon vanilla extract
- 1/2 cup smooth, natural peanut butter
- 2 tablespoons maple syrup
- 1 tablespoon coconut oil
- pinch of salt
- 1 teaspoon coconut oil
- 300 g dairy free chocolate chips or chocolate bars, chopped
Instructions
- Preheat oven to 350°F/180°C. Line or lightly grease a couple of baking sheets and set aside.
- In a medium sized mixing bowl: whisk together the almond flour, coconut flour and salt.
- Add the coconut oil, maple syrup and vanilla extract. Mix into a soft dough.
- Place the dough in between two large pieces of baking paper and roll out until about 1/8-1/4 inch thickness.
- Peel off the top layer of baking paper and cut the dough with a cookie cutter into 2 inch round cookies. Carefully transfer each cut out cookie to your prepared baking sheets. Leave about 1/2 inch in between each cookie.
- Bake in the middle of the oven for 9-10 minutes until the edges look lightly golden and cooked. Remove and let cool until you’re ready to add the peanut butter.
- While the cookies are cooling: mix the peanut butter, coconut oil, maple syrup and salt together in a small sauce pot. Warm over a low heat until everything has melted and mixed together.
- One at a time: scoop out about a teaspoon worth of the peanut butter mixture and carefully spread onto each cookie. Repeat until every cookie has been topped with peanut butter.
- Transfer the cookies to a baking sheet or plate that can fit inside your freezer. Place in the freezer for at least 30 minutes or until the peanut butter has set.
- Melt the chocolate and oil in a microwave or double boiler.
- Let the chocolate cool enough to handle and then begin dipping cookies. Dip the cookies peanut butter side down into the chocolate. Let excess chocolate drip back into the bowl then place the cookies on a piece of baking paper or silicone mat to dry. Repeat until each cookie has been dipped.
- Let the cookies cool at room temperature or speed up the process by transferring them to the refrigerator to set and enjoy!
Notes
- Cookies will keep at room temperature for about a week.
- Can be frozen for 2-3 months.
- Prep Time: 20 minutes
- Cook Time: 10 minutes
- Category: Dessert
- Method: Baking
- Cuisine: American
Nutrition
- Serving Size: 1 cookie
- Calories: 150
- Sugar: 10 g
- Sodium: 70 mg
- Fat: 10 g
- Saturated Fat: 7 g
- Unsaturated Fat: 2 g
- Trans Fat: 0 g
- Carbohydrates: 15 g
- Fiber: 2 g
- Protein: 3 g
- Cholesterol: 0 mg